Camouflage Patterns (under HEAVY construction)
CamoPicker was designed to be very user-configurable regarding the types of things to be camouflaged, what kind of camouflage patterns to use, and the paint systems that provide the colors. Unfortunately, the act of adding your own stuff requires a lot more experience with a PC and the various applications/Windows utilities that need to be used.
Given the "living breathing" nature of software, I'm not going to try and keep up to date with all the latest and greatest versions of everything out there. I'm also not going to recommend the use of one program over another, but these instructions WILL be limited to the program and utilities I use.
To create weapon and camo templates, I use an OLD version (8.0) of Paint Shop Pro. This software costs money (albeit very little compared to Photoshop), but there is a free paint program available called Paint.Net which appears to have the features necessary to perform the necessary actions to create patterns and templates for use by CamoPicker. The most important feature your paint program should have is "layers". No, Microsoft Paint that comes with Windows is NOT suitable for this task.
How Weapons and Patterns Are Used in CamoPicker
The image of the weapon that you see in CamoPicker is a combination of a camouflage pattern and a weapon template. Each of these two things are comprised of one or more images that we call "layers". Creating a weapon image is nothing more complicated than starting with the first camouflage layer, and overlaying that layer with the next until the pattern is completed. This is followed by overlaying the weapon template layers.
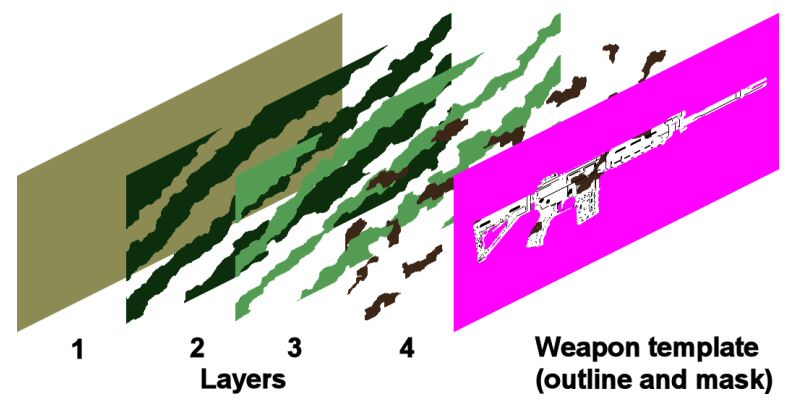
Finally, the item in the finalized image is "cut out", and we end up with a camouflaged weapon.
It all sounds pretty simple, and it is, but in order to add your own camouflage patterns and weapon templates, you have to strictly adhere to a very narrowly defined set of rules. These rules are described in the next two sections.
General Rules
The following requirements must be strictly adhered to, or I can't guarantee your results.
- Each layer MUST exist in its own file.
- Each layer file MUST be a .PNG file with alpha transparency enabled.
- Each layer file MUST have a width of 1500 pixels, and a height of 720 pixels, as
well as a DPI setting of 96 dots per inch.
Creating Your Own Camouflage Pattern
A camouflage pattern can be comprised of from one to six layers. Each layer exists in its own PNG file (as described above). Each layer file name must have a common prefix, like "MyCamoPattern", following by an underscore and the layer number. If you look in the CamoPicker Patterns folder, you'll see several examples, like this one:
- CPMarpat_1.png
- CPMarpat_2.png
- CPMarpat_3.png
- CPMarpat_4.png
- CPMarpat_5.png
The first layer file should always be a solid MAGENTA background. Each subsequent layer should be areas on magenta on a transparent background.
IMPORTANT!!! Why magenta? First, it's because it's a color you don't normally see in nature (or anywhere else for that matter). Second, we need to establish a color that can be replaced by the actual layer color. If it's not magenta, it won't be replaced, and your patterns will look just plain bizarre. In fact ALL pattern layers require that the background be either solid magenta, or magenta areas where you want a layer color to be applied. Anything that ISN'T magenta, should be transparent.
Creating a Camouflage Layer File Set
Probably the best way to start is by copying an existing first layer file to a new file (with a different name of course), and load it into your paint program. Once you've done that, do this:
- Add a new *raster* layer to the image, and make sure this layer has a
transparent background.
- On the newly added layer, draw your desired pattern using any SINGLE color
you like. I prefer to use either blue, red, green, yellow, or black on each
layer (but never using the same color on more than one layer). Keep in mind
that portions of this layer should NOT be painted because you want some of
the previous layer to show through.
One other item of note is that you should probably not use feathered edges for drawing. CamoPicker doesn't use multiplying to replace colors, so using a feathered paintbrush or pen will make your resulting pattern look kinda strange around the edges when it's rendered in CamoPicker. - Repeat until you have as many layers (up to 6) as you need for your
pattern.
- Select each layer, and replace the color you used with magenta.
- After you replace the color, save the layer as its own PNG file.
- Remember that each layer must be named precisely, as described at the
beginning of this section.
Once you've created the camouflage layers, you need to edit the "CamoPatterns" section CamoPickerData.xml file in order to add the new camoufllage pattern. Use the existing entries as an example. You must complete this step in order for CamoPicker to "see" the new camo pattern.